


Have you logged into your system yet...?
Here’s a link to the system portal - click the link or image and log in with your new credentials provided in the email we sent you
(Didn’t get the email? Click here to resend)
Asset & Sensor Registration
Now that you have your log in details, you’re almost ready to LoveYourAsset - it’s time to configure your system, register your assets and sensors, and get connected…
Before you start - What You’ll Need:
Before configuring your system, to make the process much quicker and easier, you will need the following Asset and Sensor information to hand:

List of all Assets you would like to monitor, with descriptions and any corresponding information or files (images, manuals, etc.) for every asset.
Asset Group names and descriptions.
Sensor information - name, description and details with thresholds and ‘weights’ for each asset group.
(Once your Asset, Sensor and Group info has been entered, you will then also need access to authorize system/sensor connection to push your data to your LoveYourAsset system and dashboard)
This information can usually be found already pre-populated in other asset management system files and documentation - access to these will make the process easier!
Once you have all the information to hand (preferably something you can copy and paste!), download your free LYA Bulk Load Tool (click here) - This will make your LYA system configuration so much quicker and easier…!
LYA Bulk Load Tool
(click to download)
LYA Bulk Load Tool
We’ve added a configuration tool to make setting up your system quicker and easier…
The Asset and Sensor information required to create your dashboard, reports and alerts are entered in bulk using the LYA Bulk Load Tool - individual Assets, Sensors and Groups can also be added and edited manually without the tool.
Once downloaded, connect the LYA Bulk Load Tool to your LYA system using the same log in credentials, as provided in your welcome email (didn’t get the email? click here)
1 -From the LYA Portal (Configuration page), Click on LYA Bulk Load Tool’ icon from the grey menu bar (top left of the screen) to download - it’s secure and free (can also be downloaded here).
2 -Once downloaded, open the Tool file - this usually opens with Excel, or your usual list/table software. Once opened, you’ll see there are 5 sheets (pages) - to get you started you’ll find a quick guide and contact links in the ‘About’ sheet tab
3 -The LYA Bulk Load Tool will open on the Config Sheet, ready for your connection user name and password, if not, click on the ‘Config’ sheet tab
4 -Enter User Name (usually user email address) and Password, then click the ‘Connect Bulk Load Tool’ box to connect the tool to your LYA system portal (a confirmation window appears when the tool is successfully connected).
5 -Once the tool is connected, you can then click into the Groups, Assets and Sensor Definitions sheet tabs (bottom left) - these 3 sheets must all be updated on a sheet-by-sheet basis.

By selecting UPLOAD/DOWNLOAD (big orange button top right of main table) from the drop-down, you can:
-DOWNLOAD current Groups, Assets and Sensor Definitions registration information from your LoveYourAsset system
-UPLOAD new/updated Groups, Assets and Sensor Definitions information entered here, to your LoveYourAsset system (chosen action will only affect the table/info currently displayed on screen)
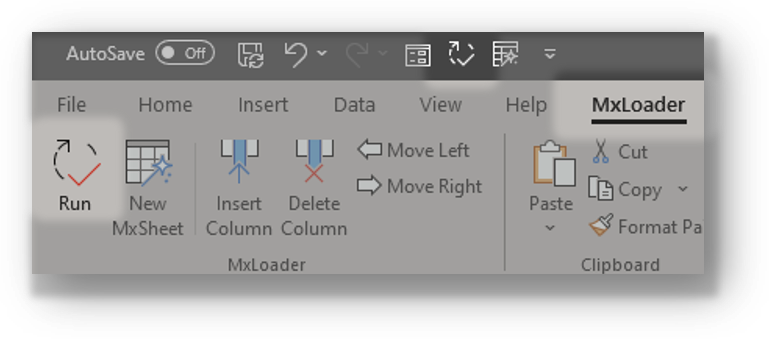
Once the UPLOAD/DOWNLOAD selector has been chosen/set, click the ‘Run’ icon (very top of screen, dark grey ribbon OR click the 'MxLoader' tab (top ribbon, right), then the ‘Run’ icon far left). NOTE: The ‘Run’ function only affects the table currently displayed on screen!
Your Bulk Reg Tool is now able update all of the required information within your LYA system, directly from the tool.
Simply populate the required fields, then after each sheet (Groups, Assets and Sensor Definitions) is completed (making sure the tool is set to ‘Upload’) click on the ‘MxLoader’ tab (top right), followed by clicking the ‘Run’ icon. This will then populate your LYA system Configuration windows with the information entered into the tool. Do this for each sheet/page (‘MxLoader’ then ‘run’ - page by page), complete with your Asset and Sensor registry, and their corresponding Groups.
Follow the simple steps below to add your Asset and Sensor registries by Group with the LYA Bulk Load Tool…
Download your current LYA Asset, Sensor & Group Registries
You can download your complete Asset, Sensor and Group registries that are currently loaded into your LYA system, using the LYA Bulk Load Tool.
Download and connect the LYA Bulk Load Tool, as explained above.
1. Click on the Group, Asset or Sensor Definitions Sheet/Tab, depending which registry you’d like to download. Registries are downloaded sheet-by-sheet.
2. Choose DOWNLOAD from the big orange box drop-down.
3. Ensure the orange box is now set to DOWNLOAD and click the ‘run’ icon from the ribbon at the top of the screen (or MxLoader Tab from the ribbon, then ‘run’.)
4. A confirmation box will appear, this will show how many entries were downloaded. Click OK to continue.
NOTE: Any entries that are currently displayed in the Group, Asset or Sensor table will be replaced with the downloaded info - remember to upload or save a copy before downloading!
Entering & Editing Asset Information
To manage your asset register and health thresholds more effectively, all assets and sensors are organised into groups. In this section we enter all the required Asset Group information and the corresponding Assets for each group (any ungrouped asset will need a group to belong to, even if it is the only asset in that group!)
To Enter A Single Asset
1. Each Asset must belong to a Group. Select the Asset Group that your new Asset will belong to and go to step 3, OR create a new Asset Group - click the ‘New Group’ button – a new row will appear at the top of the group list with space to add a new Asset Group name and description.
2. When the group name and description is populated, click Save.
3. Below the Asset Group list, is the Assets In Group window, this shows all assets in the chosen/highlighted group. Click the ‘New Asset’ button to add a new asset in this group.
4. A new asset row is added and drops down to allow you to enter a name and description for the new asset. You can also add other information here such as notes, manuals, technical info, an image and other associated files can be attached.
5. When the required information is entered, click Save.
Editing A Single Asset or Group
GROUPS
1. Select the Asset Group you would like to edit.
2. To edit, click into the group name or description and edit as required, click Save.
3. To Delete a group, simply click the trash icon, followed by the Save icon. Multiple entries can be selected for trash and deleted with 1 click of the Save icon.
NOTE: If the group contains assets or sensors, deleting will not be allowed (group must be empty to allow delete function).
ASSETS
1. Select the Asset Group that contains the Asset you would like to edit.
2. To edit, select the required Asset or click the drop-down arrow beside the Asset and edit as required, click Save icon.
3. To Delete an asset, simply click the trash icon, followed by the Save icon. Multiple entries can be selected for trash and deleted with 1 click of the Save icon.
Your new/edited asset should now be showing, under the correct Asset Group
Entering Multiple Assets With LYA Bulk Load Tool
Download and connect the LYA Bulk Load Tool, as explained above.
GROUPS
1. Click on the Group Sheet/Tab.
2. In column 1, Under LYANAME, enter a name for each group - maximum of 15 characters.
3. In column 2, under DESCRIPTION, enter a description for each group.
4. Enter your Company/Organization ID into column 3, under ORGID (your ORGID can be found beside your name in brackets on your LYA system portal Config page (top right)
5. When all groups have been added, choose UPLOAD from the big orange box drop-down.
6. Ensure the orange box is now set to UPLOAD and click the ‘run’ icon from the ribbon at the top of the screen (or MxLoader Tab from the ribbon, then ‘run’.)
7, A confirmation box will appear, click OK to continue.
ASSETS
1. Click on the Assets Sheet/Tab.
2. In column 1, Under LYAASSETNUM, enter a name for each asset- maximum of 15 characters.
3. In column 2, under DESCRIPTION, enter a description for each asset.
4. In column 3, under LYAGROUP, enter the group that each asset belongs to (as entered above).
5. Enter your Company/Organization ID into column 4, under ORGID (your ORGID can be found beside your name in brackets on your LYA system portal Config page (top right)
6. When all assets have been added, choose UPLOAD from the big orange box drop-down.
7. Ensure the orange box is now set to UPLOAD and click the ‘run’ icon from the ribbon at the top of the screen (or MxLoader Tab from the ribbon, then ‘run’.)
8, A confirmation box will appear, click OK to continue.
Editing Multiple Assets & Groups With LYA Bulk Load Tool
Download and connect the LYA Bulk Load Tool, as explained above.
1. Click on the Group, Asset or Sensor Definitions Sheet/Tab that you’d like to edit. depending which registry you’d like to download. Registries are downloaded sheet-by-sheet.
2. To ensure you have the complete current registry, choose DOWNLOAD from the big orange box drop-down.
3. Ensure the orange box is now set to DOWNLOAD and click the ‘run’ icon from the ribbon at the top of the screen (or MxLoader Tab from the ribbon, then ‘run’.)
4. A confirmation box will appear, this will show how many entries were downloaded. Click OK to continue.
5. Edit and update the information as required. When all required information has been updated, choose UPLOAD from the big orange box drop-down.
6. Ensure the orange box is now set to UPLOAD and click the ‘run’ icon from the ribbon at the top of the screen (or MxLoader Tab from the ribbon, then ‘run’.)
7. A confirmation box will appear, click OK to continue.
Your Assets and Groups should now be fully populated
Entering Sensor Information
In this section we enter all the required Sensor information for each Asset Group (all sensors will need a group to belong to, even if it is the only sensor in that group!)
To Enter A Single Sensor
1. Each Sensor must belong to a group. Select the Asset Group that your new Sensor belongs to or create a new Asset Group (by clicking the ‘Add New Group’ button – a new row will appear at the top of the group list with space to add a new Asset Group name and description. When these are completed, click Save).
2. Beside the Asset Group list, is the Sensors In Group window, this shows all Sensors in that group. Click the ‘Add New Sensor’ button to add a new Sensor to the chosen/highlighted group.
3. A new Sensor row is added and drops down to allow you to enter a name and description for your new Sensor. You can also add any more information here such as notes, manuals, technical info, even images and associated files can be attached. You can also populate the Weight, Upper and Lower boundaries and limits, and other sensor info here.
4. When the required information is entered, click save.
Your new Sensor should now be showing, under the correct Asset Group
Entering Multiple Sensors With LYA Bulk Load Tool
Download and connect the LYA Bulk Load Tool, as explained above.
1. Click on the Sensor Sheet/Tab.
2. In column 1, Under LYANAME, enter a name for each sensor- maximum of 15 characters.
3. In column 2, under DESCRIPTION, enter a description for each sensor.
4. Columns 3 to 6 are the Lower Limit, Lower Boundary, Upper Boundary and Upper Limit fields (see below).
5. Enter the Weight for each sensor - value must not exceed 100 when added to other sensor weights in the chosen group (see below).
6. Enter your Company/Organization ID into column 8, under ORGID (your ORGID can be found beside your name in brackets on your LYA system portal Config page, top right)
7. In column 9, under LYAGROUP, enter the group that each sensor belongs to (as entered above).
8. When all sensors and info have been added, choose UPLOAD from the big orange box drop-down.
9. Ensure the orange box is now set to UPLOAD and click the ‘run’ icon from the ribbon at the top of the screen (or MxLoader Tab from the ribbon, then ‘run’.)
10. A confirmation box will appear, click OK to continue.
Editing Multiple Sensors With LYA Bulk Load Tool
Download and connect the LYA Bulk Load Tool, as explained above.
1. Click on the Sensor Definitions Sheet/Tab.
2. To ensure you have the complete current registry, choose DOWNLOAD from the big orange box drop-down.
3. Ensure the orange box is now set to DOWNLOAD and click the ‘run’ icon from the ribbon at the top of the screen (or MxLoader Tab from the ribbon, then ‘run’.)
4. A confirmation box will appear, this will show how many entries were downloaded. Click OK to continue.
5. Edit and update the information as required. When all required information has been updated, choose UPLOAD from the big orange box drop-down.
6. Ensure the orange box is now set to UPLOAD and click the ‘run’ icon from the ribbon at the top of the screen (or MxLoader Tab from the ribbon, then ‘run’.)
7. A confirmation box will appear, click OK to continue.
Your Sensor and corresponding Asset Groups should now be fully populated
Sensor Limits & Boundaries
When we begin to receive data from our sensors, we need to understand what the data value actually means - is the value low or high? …Good or bad?
We do this by giving each sensor 5 levels of performance:

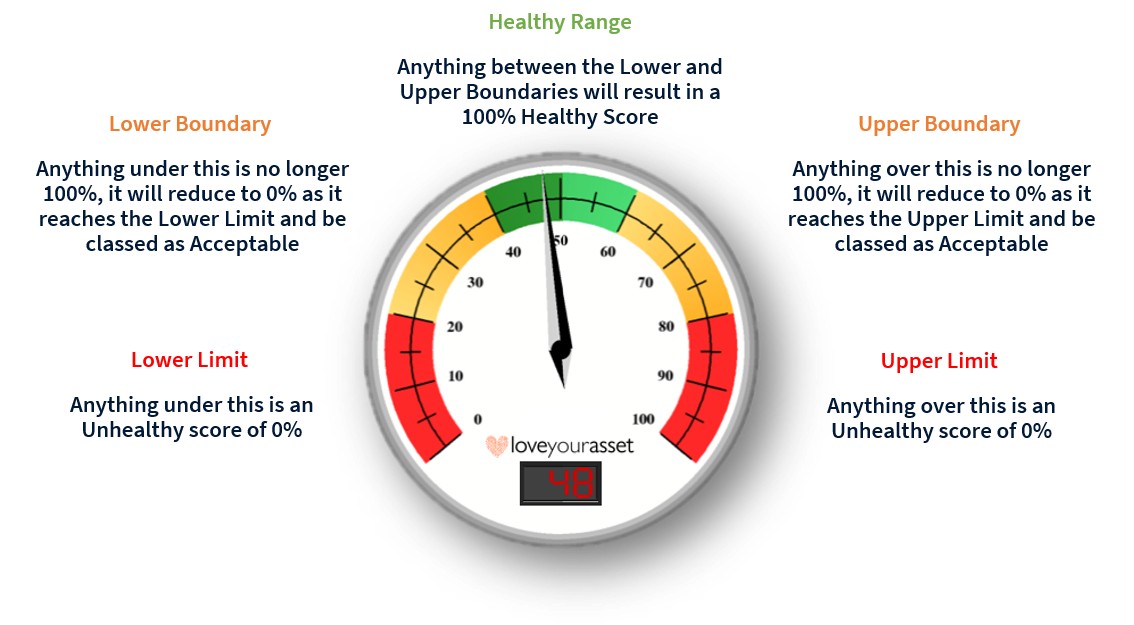
Sensor ‘Weight’
Each group has up to 5 associated sensors. There may be occasions where 1 of those sensors has a bigger influence on the performance of the group than others and so should be given more attention/importance. We can do this by ‘weighting’ the sensors.
For example, if all 5 sensors have equal influence regarding performance they would all be 20%, but if one of the sensors needed more ‘sway’ regarding the overall health score of the group, perhaps it would be set to 60% and the others at 10% each
Data Link
Now that your assets and sensors are all registered and organised into the right groups with corresponding thresholds, weights, etc. you’re almost ready to connect the dashboard! With registry info in place, we can generate your exclusive LYA sensor ID report, to allow your system to securely point your sensor data to your dashboard, by linking sensor data with our LYA Data Link API…
LYA Data Link API
In your welcome email, under useful links, you’ll find your ‘LYA Data Link API’ link. Use our API to link your sensor data to your LYA system. Each sensor data-stream needs an ‘address’ to send the data to - you’ll find these in your ‘Unique ID’ report - follow the steps below…
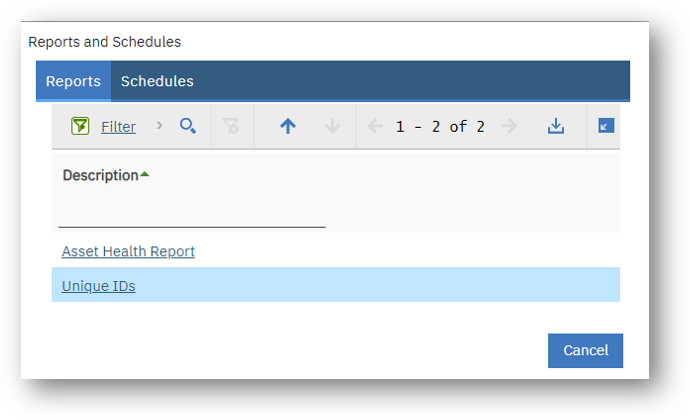
Download a ‘Unique ID’ report for your entire Sensor Registry
1. Once Group, Asset and Sensor registries have been loaded into your LYA system, a ‘Unique ID’ report is auto-generated, you can find this by clicking the report icon in the top grey menu bar. This report re-lists all of your sensors with full directory location information in a universally recognized format.
This report can then be used to instruct your data management system to push your data through to your dashboard.
2. Add the required sensor data information using the LYA Data Link API along with your current Sensor Management System or Gateway/Infrastructure info, to implement the instruction to push sensor data to your LYA dashboard (see below - please contact us to support you through this step if required - without direct admin access to your system, we can not implement these instructions, but will be happy to guide you through.)

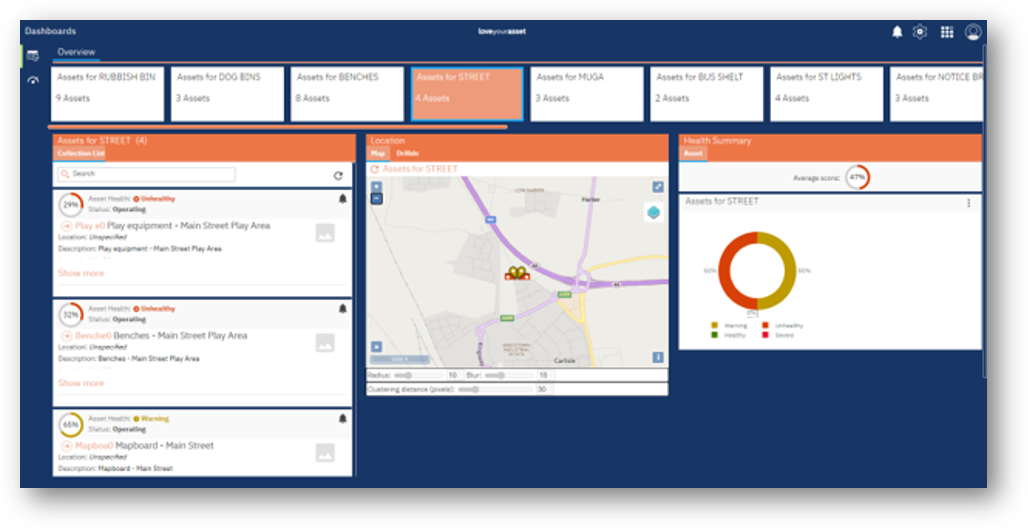
Once in place, data will flow into your LYA system within seconds of confirmation – from the LYA system portal, click the ‘go to Dashboard’ button - you’ll be taken to your default Dashboard where you’ll find all your groups (in ‘cards’ across the top), with associated assets and sensors below.
How Sensors get their message across - Internal Systems
Most sensors don’t send messages - they continuously take readings, which you can leverage/capture/record by connecting the sensor to your own internal system/infrastructure. There are many data management systems available to do this depending on requirements, from EAM systems like Maximo, SAP, etc. to industry specific solutions like SCADA and PI - there are also many stand-alone, off-the-shelf solutions ranging from basic to advanced, that will allow you to manage your sensor data and connection to the rest of the world, allowing the data they produce to be distributed or redirected (feel free to contact us to discuss your current data management system and requirements).
Many organizations have assets laden with sensors that aren’t actually connected to anything - or sometimes even connected, but not used, simply stored in a database - one Oil & Gas client discovered that 99% of their data went unused!
So your sensors take a reading (produce data), and your internal data management system allows the sensor to forward that reading/data through online connection - now we need to tell the system where to forward this data to…
Push Data Instructions - Internal Data Management Systems and Formats
Watch this space for upcoming support on implementing Push Data instructions for most popular data management system and formats
Data from your Assets, Sensors and Groups should now be accessible from your dashboards – Your Finger is now on the Pulse!
Click here to continue to Dashboard, Reports & Alerts…